This tutorial will guide you through the installation and setup of the AVR GCC Toolchain under Microsoft Windows. You’ll also learn how to install some additional and useful tools that will help you write easier your first microcontroller programs.
Prerequisites
What do we need to complete this guide?
- Computer with Microsoft Windows – version 7, 8, or 10.
- Administrative access to Windows.
- One USB port – available for use.
- ISP programmer – type USBasp is recommended.
- AVR-powered microcontroller board – we use, as always, a Tinusaur board.
NOTE: It takes about 2 hours for an inexperienced person to do it.

1. What is AVR GCC Toolchain?
The AVR GCC Toolchain is a collection of tools and libraries used to compile your code for the AVR microcontrollers. This collection includes a compiler, assembler, linker, and some libraries.
Most of the tools are based on efforts from the GNU community (GCC stands for GNU Compiler Collection), and some others are developed by Microchip.
2. What is WINAVR?
WINAVR is a great project or rather was.
It was an installation package for Windows that contained everything you needed to compile your C or C++ code for AVR microcontroller under Windows and most importantly, for people like me, it allowed us to do it in the text console.
The most “recent” WINAVR files are from 2010-01-20. 🙂 In other words, it is outdated.
There are many projects that attempted to replace it but none of them (AFAIK) is extremely popular.
This guide will walk you through the steps on how to setup everything manually. There is no installation package that you could run and that will do everything for you.
3. AVR GCC Toolchain – Setup for Windows

To setup and use AVR GCC Toolchain we need 3 essential components:
- AVR GCC – Windows Binary
- GNU Make – on Windows
- AVRDUDE – on Windows
All the suggested downloads, folders, and file names are based on our own setup and some of them could be changed according to your preferences.
AVR GCC – Windows Binary
Let’s start with the AVR GCC. Let’s download it from the Microchip website.
Toolchains for AVR® Microcontrollers (MCUs):
On the page, look for “AVR 8-bit Toolchain v3.62 – Windows” or similar.
You will need an account (free registration) to download the ZIP archive. It is debatable if this Free and Open Source software should be put behind a registration wall, but it is rather an ethical issue than legal.
Create a “Programs” folder (if it does not exist already) for the various programs that we’re going to install. The name and location are up to you, those given here are just an example.
C:\Users\MY_USER_NAME\Programs\
Extract the contents of the ZIP file in the “Programs” folder. All the folders and files should be in an “avr8-gnu-toolchain-win32_x86” folder”. Let’s rename that to “avr8-gnu-toolchain” just to simplify thong – it is not required.
The Toolchain is now at:
C:\Users\MY_USER_NAME\Programs\avr8-gnu-toolchain\
The sub-folders should look something like this: avr, bin, doc, i686-w64-mingw32, include, info, lib, libexec, man, share.
Do not add anything to your Windows Environment PATH variable.
Alternatives
There is a very interesting project that you could use as an alternative:
AVR-GCC 11.1.0 for Windows 32 and 64 bit
The AVRGCCStart.cmd Script
It would’ve been very convenient if there was a command that would start the console development environment for us. So, let’s create a short command prompt script that will setup everything for us. Let’s call it AVR GCC Toolchain STARTER.
Instead of adding the file system Path of the Toolchain to the system PATH (in the environment variables) we are going to create that simple command prompt script that will do this only for the command prompt that we will open with that script. The advantage of doing it this way is that we’re not going to “contaminate” the system PATH variable with too many executables and libraries. Doing otherwise might cause issues with some other already installed development environments.
How to create the AVRGCCStart.cmd file?
- Open the Windows Notepad application.
- Press CTRL + S (to save).
- Type in the name “AVRGCCStart.cmd”.
Choose a folder where to save the file – the “Programs” folder is a good choice.
Add the following lines to the AVRGCCStart.cmd file:
set Path=%Path%;C:\Users\MY_USER_NAME\Programs\avr8-gnu-toolchain\bin
set Path=%Path%;C:\Users\MY_USER_NAME\Programs\avr8-gnu-toolchain\avr\bin

start cmd
That will add what is necessary to the Path and will open a command prompt window.
IMPORTANT: Don’t forget to replace MY_USER_NAME with your username.
Testing
Start the AVRGCCStart.cmd script.
In the command prompt execute:
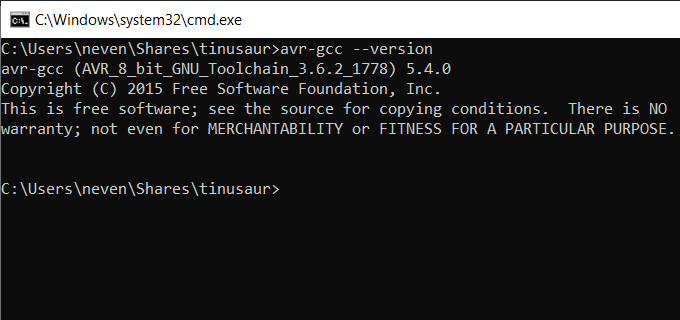
avr-gcc --version
That should output the version of the AVR GCC compiler. Something like this:
avr-gcc (AVR_8_bit_GNU_Toolchain_3.6.2_1778) 5.4.0
That also means that everything is correctly installed and setup up to this point.
GNU Make – on Windows
In order to package all the compiled C or C++ source code into a HEX file in a convenient way, i.e. by using the so-called Makefile, we need the GNU Make program.

There are many bundles for Windows that contain the GNU Make – we are going to use the GnuWin Packages located at http://gnuwin32.sourceforge.net/packages.html. They are part of the GnuWin (also known as gnuwin32) project at http://gnuwin32.sourceforge.net/.
In the “Programs” folder create a “gnuwin32” sub-folder for the gnuwin32 packages.
Download the Make packages from: http://gnuwin32.sourceforge.net/packages/make.htm
- Locate the Binaries ZIP file. This should be something like “make-3.81-bin.zip”. Download it to your computer.
- Extract the contents in the gnuwin32 folder.
The sub-folders and files should look like: bin, contrib, man, manifest, share.
The make.exe requires some additional libraries, so we should download also the Dependencies (a file like “make-3.81-dep.zip”) from the same page and extract them at the same location.
Optionally, you could download and extract the Documentation.
NOTE: If the GnuWin32 web page does not work for some reason, you can go directly to https://sourceforge.net/projects/gnuwin32/files/make/3.81/ and download the “make-3.81-bin.zip” file.
Update AVRGCCStart
Edit the AVRGCCStart.cmd script – add the following line (before the “start cmd” line):
set Path=%Path%;C:\Users\MY_USER_NAME\Programs\gnuwin32\bin
Don’t forget to replace MY_USER_NAME with your username.
IMPORTANT: Every time you update the content of the AVRGCCStart.cmd script – close its open windows (if there are any) and relaunch the script again, so the changes will take effect.
Testing
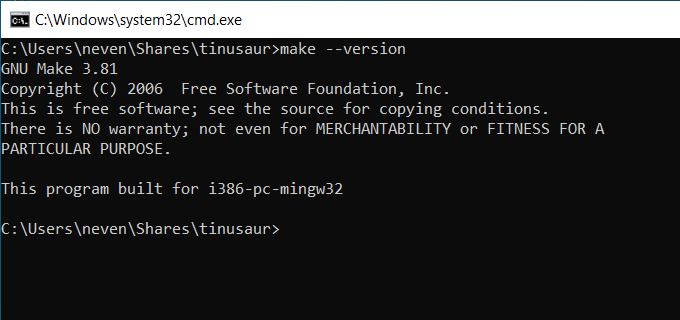
In the command prompt execute:
make --version
That should output the version of the GNU Make. Something like this:
GNU Make 3.81
That also means that everything is correctly installed and setup up t this point.
GNU CoreUtils for Windows

Some Makefile files (like ls, rm, mv, mkdir, etc. – those we are going to use later) might need other GNU tools that are part of the GNU CoreUtils.
Download the CoreUtils package: http://gnuwin32.sourceforge.net/packages/coreutils.htm
- Locate the Binaries ZIP file. This should be something like “coreutils-5.3.0-bin.zip”.
- Extract the contents in the gnuwin32 folder.
- Download and extract Dependencies.
- Optionally, download and extract the Documentation.
NOTE: Some of the files in the Dependencies package might already exist in the gnuwin32 folder – it’s OK to override (or skip) them.
Recommended Packages
Grep for Windows: http://gnuwin32.sourceforge.net/packages/grep.htm
Alternatives
- The GNU Make could also be downloaded from the Steve.fi (Steve Kemp) website:
https://steve.fi/software/make/
Please, note that those are quite old.
- Another alternative is the Gow (Gnu On Windows) project – a lightweight alternative to Cygwin.
https://github.com/bmatzelle/gow
Please, note that those are quite old.
Testing
In the command prompt execute:
ls -la
That should list the files in the current folder. Something like this:
total 20
drw-rw-rw-   2 neven 0     0 2021-12-28 17:09 .
drw-rw-rw-  32 neven 0 12288 2021-12-28 15:52 ..
-rwxrwxrwx   1 neven 0   205 2021-12-28 17:37 AVRGCCStart.cmd
That also means that everything is correctly installed and setup up to this point.
AVRDUDE on Windows
When we start compiling our programs and packaging them as HEX files we are going to need a program to upload them to the microcontroller. One such and very popular program is the AVRDUDE. And yes, there is, of course, a build for Windows.
In the “Programs” folder create an “avrdude-mingw32” sub-folder for the AVRDUDE package.
Go to download.savannah.gnu.org/releases/avrdude/ and locate the mingw32 ZIP file.
At the time of writing this guide, the most recent version that works out of the box without the need to install additional libraries and/or packages is 6.3.
Download the AVRDUDE package: download.savannah.gnu.org/releases/avrdude/avrdude-6.3-mingw32.zip
- Locate the Binaries ZIP file. This should be something like “avrdude-6.3-mingw32.zip”.
- Extract the contents in the avrdude-mingw32 folder.
NOTE: The 6.4 version of the AVRDUDE requires the “libhidapi-0.dll” library that might not be available on your computer.
The libusb0.dll problem
This is important!
The avrdude program requires the libusb library located in the libusb0.dll file. Note that this file is not part of the AVRDUDE ZIP package.
The issue could get a bit more complicated because the driver installation procedure described in one of the sections below uses the Zadig (which is a great program). That will place a libusb0.dll file in the “C:\Windows\System32” folder, but that file might not be compatible with our AVRDUDE package.
Here is a short description of the problem. The libusb0.dll comes in 2 flavors – one to be used in the 32-bit and another one for 64-bit software. The AVRDUDE needs the 32bit version while Zadig comes with the 64-bit version.
Here is a solution to the problem. We will get a 32-bit flavor of the libusb0.dll and will put it in the same folder where AVRDUDE is.
Getting the libusb0.dll
The libusb0.dll file that is part of the libusbK project (located at https://sf.net/p/libusbk) is what we need.
The latest suitable release is 3.1.0.0 located at:
https://sourceforge.net/projects/libusbk/files/libusbK-release/3.1.0.0/
Download the libusbK-3.1.0.0-bin.7z file and extract its contents in a temporary location.
Locate the \libusbK-3.1.0.0-bin\bin\dll\x86 folder and the libusb0.dll file.
Check file properties, the “Digital Signature” tab and make sure that it is valid:
Travis Lee Robinson – Tuesday, 17 January, 2012 19:40:19
Copy the libusb0.dll file over to our AVRDUDE folder – avrdude-mingw32.
Alternatives
- There is AVRDUDE (by mariusgreuel) located at https://github.com/mariusgreuel/avrdude. It includes all the necessary libraries in the binary.
NOTE: Might not work on 32-bit Windows.
Update AVRGCCStart
Add the following line to the AVRGCCStart.cmd script (before the “start cmd” line):
set Path=%Path%;C:\Users\MY_USER_NAME\Programs\avrdude-mingw32
Testing
In the command prompt execute:
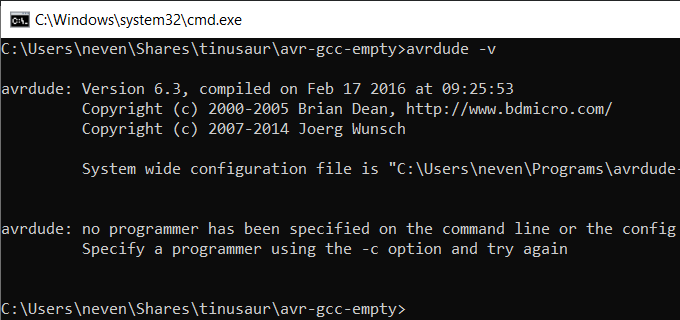
avrdude -v
That should output the version of the AVRDUDE . Something like this:
avrdude: Version 6.3, compiled on Feb 17 2016 at 09:25:53
That also means that everything is correctly installed and setup up to this point.
USB Programmer Drivers
To upload the compiled and packaged binary code (in the form of a HEX file) into the microcontroller we will need a Programmer. In most cases that is a USB device. A very popular device is the USBasp programmer. Under Windows such devices require an additional driver to be installed for them to work properly.
One of the best and easiest ways to install a driver for that kind of Programmer is to use the Zadig program.
- Download the latest EXE file from https://zadig.akeo.ie.
- Insert your USBasp programmer into the USB of your computer.
- Run the program. You may need to click on some warning buttons that Windows will show you.
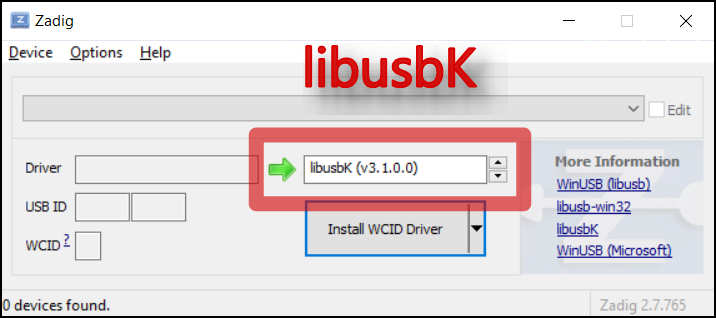
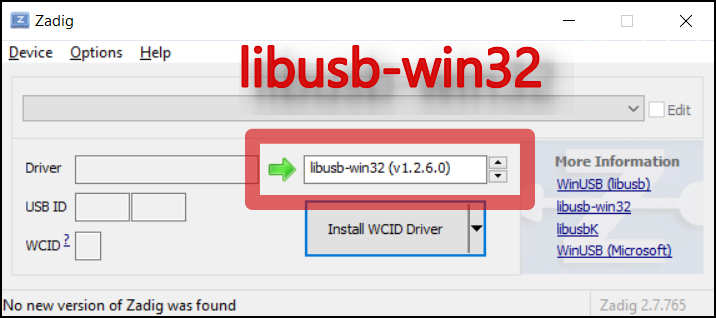
- Choose the correct driver which is the “libusbK”.
Note: on 32-bit WIndows you need to choose libusb-win32. - Press the “Install” button.
You might need to wait a minute or two.
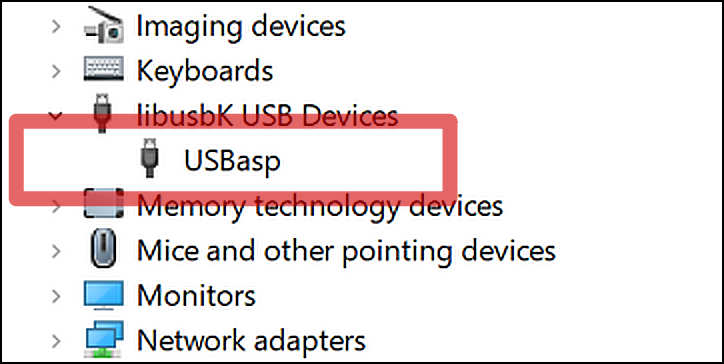
Check on Windows Device Manager if the driver was installed correctly.
Testing
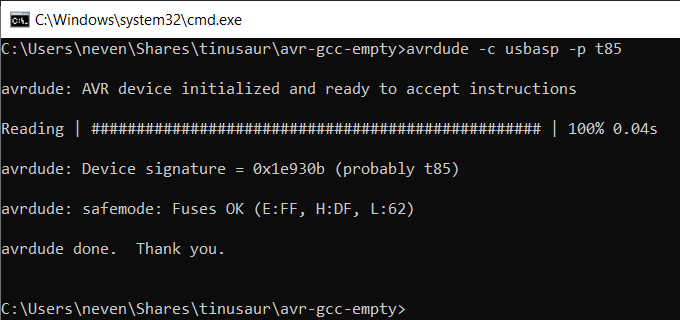
Let’s now check if the USBasp programmer could communicate with our microcontroller (ATtiny85). First, make sure that the USBasp programmer is inserted in the USB and connected to the microcontroller board. Execute this command:
avrdude -c usbasp -p t85
The result should be something like this:
avrdude: AVR device initialized and ready to accept instructions
Reading | ################################################## | 100% 0.09s
avrdude: Device signature = 0x1e930b (probably t85)
avrdude: safemode: Fuses OK (E:FF, H:DF, L:62)
avrdude done.  Thank you.
If we have a microcontroller different than the one specified in the command (ATtiny85) the avrdude will suggest what it might be.
Other Useful Tools
Those were the minimum tools that we will need to compile our source code for the AVR platform.
The following are recommended but not required additional tools.
Shell – BASH

It will be convenient to have a console that is a bit better than the Windows Command Prompt. A good alternative is the BASH shell. Developed as part of the GNU Project it is now used on many other operating systems including Linux, Android, Mac OS, and of course – Windows.
OPTION-1
We have put together an archive that consists of the bash.exe and a few other necessary .dll files. It is located at our GitLab repository:
- https://gitlab.com/tinusaur/bash-mingw/-/releases,
and also at our GitHub repository - https://github.com/tinusaur/bash-mingw/releases
Download the ZIP archive and extract it at a temporary location.
Copy the “bash-mingw” sub-folder to the “Programs” folder.
The BASH executable will be located in the “Programs\bash-mingw\bin“ folder.
OPTION-2
At Steve.fi – (Steve Kemp’s website) there is a Windows binary for download. It is quite old but still works.
In the “Programs” folder create a “bash” sub-folder for the bash package.
Go to the website: https://steve.fi/software/bash/
- Locate the download link: https://steve.fi/software/bash/bash-203.zip
- Download and save the ZIP file.
- Extract the contents into a temporary location. There will be a bash-2.03 folder.
- From the bash-2.03 folder, copy 2 files: bash.exe and bash.dll, into the “Programs/bash” folder.
- Optionally, you could also copy the .bash.rc file in your home folder:
C:\Users\MY_USER_NAME\
Edit it – if you know how it functions.
NOTE: The executables are really old – some of them date back to 1998, 1999.
Alternatives
- win-bash – A stand-alone bash for Windows
http://win-bash.sourceforge.net - How To Install Bash On Windows 10
https://hackernoon.com/how-to-install-bash-on-windows-10-lqb73yj3
Update AVRGCCStart
Add the following line to the AVRGCCStart.cmd script (before the “start cmd” line):
set Path=%Path%;C:\Users\MY_USER_NAME\Programs\bash-mingw\bin
Replace the line:
start cmd
With:
set HOME=%USERPROFILE%
start bash

Testing
Start the AVRGCCStart script.
It should look like this:
bash-3.1$_
Note: You might see some warning messages about a missing “tmp” folder.
Text editor – nano
A console-based text editor will be (optional) a nice finish!
The nano text editor is very popular and is available even for Windows.
GNU nano for Windows is a good option and it is located at:
https://github.com/lhmouse/nano-win
The package could be downloaded from this page:
https://files.lhmouse.com/nano-win/
Look for the latest build at the bottom. Should be something like “nano-win_9732_v5.9-10-ga2d202368.7z”. Download it and extract it into a temporary location. It should look like this:
pkg_i686-w64-mingw32 (this is the 32-bit version)
pkg_x86_64-w64-mingw32 (this is the 64-bit version)
.nanorc
In the “Programs” folder create a “nano” sub-folder for the nano package.
Pick a folder for a 32 or 64 bit version, depending on your computer, and copy its contents (something like bin, share, etc.) to the “nano” sub-folder.
Optionally, copy the .nanorc file to your home folder.C:\Users\MY_USER_NAME\
Alternatives
- nano for Windows
https://sourceforge.net/projects/nano-for-windows/
Note: this is a version of the one above. - nano – Text editor / win32-support
https://nano-editor.org/dist/win32-support/
Note: might not work on a 32-bit Windows.
Update AVRGCCStart
Add the following line to the AVRGCCStart.cmd script (before the “start cmd” or “start bash” line):
set Path=%Path%;C:\Users\MY_USER_NAME\Programs\nano\bin
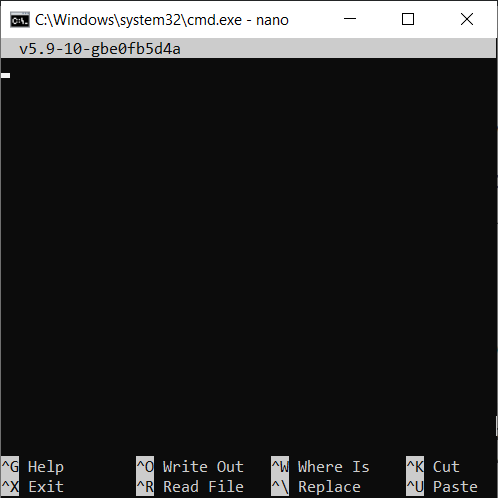
Testing
- In the command prompt execute:
nano --version
That should output the version of the nano. Something like this:
GNU nano from git, v5.9-10-gbe0fb5d4a
- In the command prompt execute:
nano
That should start the nano editor.
To exit the editor press CTRL + X.
The “^” symbol in the menu means that you have to press the “CTRL” key.
Update AVRGCCStart
Before we start the command prompt with either “cmd” or “bash”, we could go to the Home or other folder (let’s say our projects folder).
Add a line to the script before the “start bash” line:
cd %HOME%
At this point the contents of the AVRGCCStart.cmd file should be something like this:
set Path=%Path%;C:\Users\MY_USER_NAME\Programs\avr8-gnu-toolchain\bin
set Path=%Path%;C:\Users\MY_USER_NAME\Programs\avr8-gnu-toolchain\avr\bin
set Path=%Path%;C:\Users\MY_USER_NAME\Programs\gnuwin32\bin
set Path=%Path%;C:\Users\MY_USER_NAME\Programs\avrdude-mingw32
set Path=%Path%;C:\Users\MY_USER_NAME\Programs\bash-mingw\bin
set Path=%Path%;C:\Users\MY_USER_NAME\Programs\nano\bin

set HOME=%USERPROFILE%
cd %HOME%
start bash
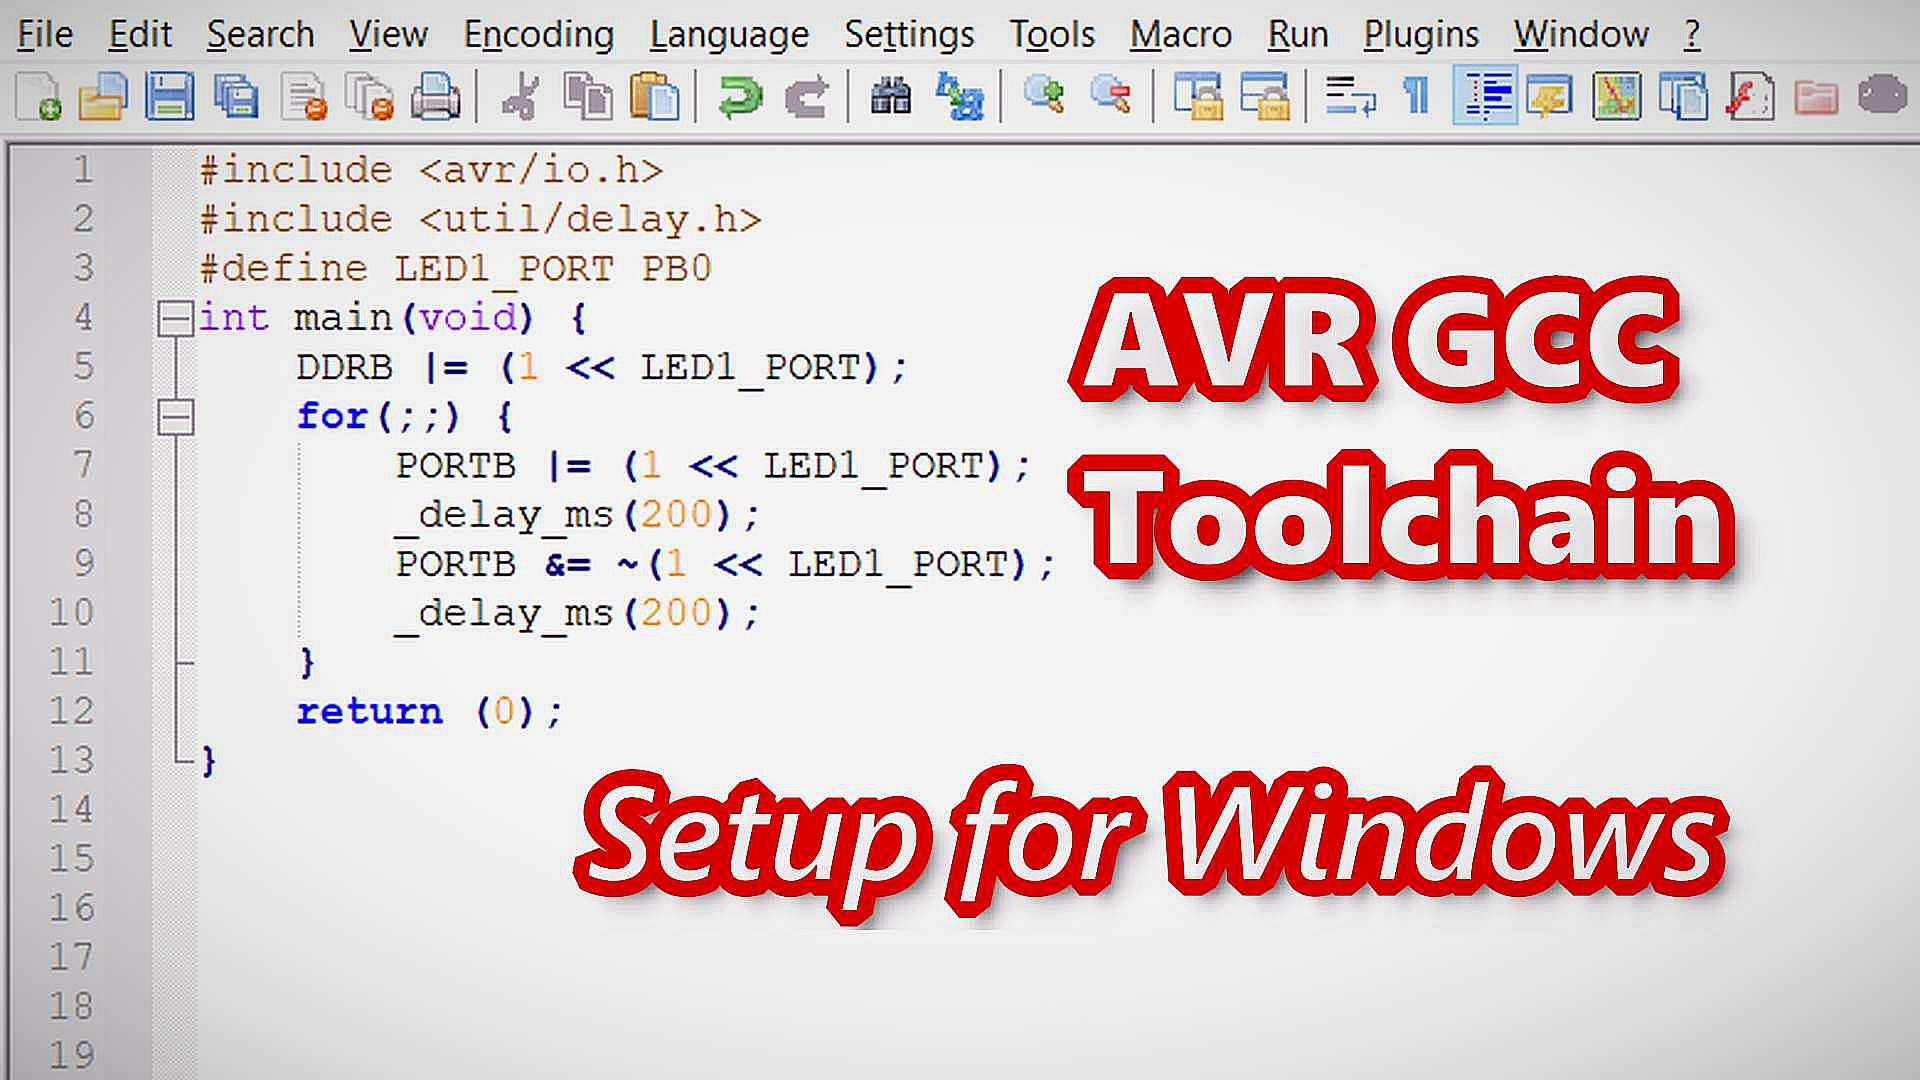
4. AVR GCC “Hello, World!”
Let’s now write our first program – the “Hello, World!”.
In the world of microcontrollers, this is the Blinking LED program.
But, before that let’s see if we can write, compile, package, and upload any program.
AVR GCC – The “Empty” Program
Let’s first create a folder (if it doesn’t already exist) where we will put all our projects.
mkdir Projects
cd Projects
Let’s now create a working folder. Let’s call it “avr-gcc-empty”.
mkdir avr-gcc-empty
cd avr-gcc-empty
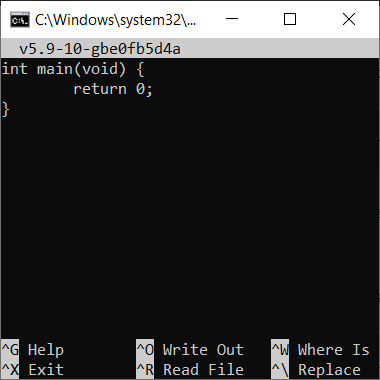
Let’s write just a few lines of code in a “main.c” file.
Start the nano with a new file – main.c:
nano main.c
Enter the code:
int main(void) {
    return 0;
}
- Compile the source code:
avr-gcc main.c -o main.elf
Note: the result will be an ELF file – main.elf.
We need to convert it to a HEX file,
- Convert to HEX:
avr-objcopy main.elf -O ihex main.hex
The result is a main.hex file.
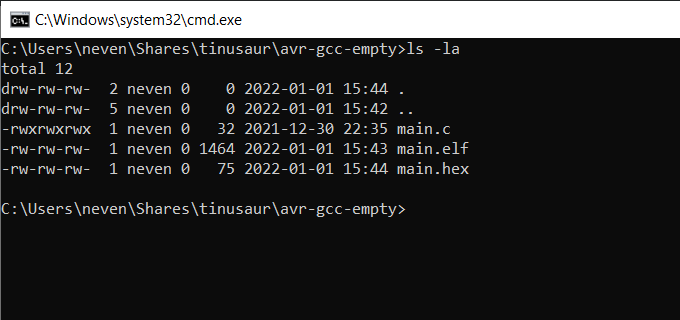
Let’s see what’s inside of the file:
cat main.hex
The result should look li this:
:10000000CF93DF93CDB7DEB780E090E0DF91CF9163
:02001000089551
:00000001FF
Now, with the AVRDUDE we could upload that file into the microcontroller:
- Upload the HEX:
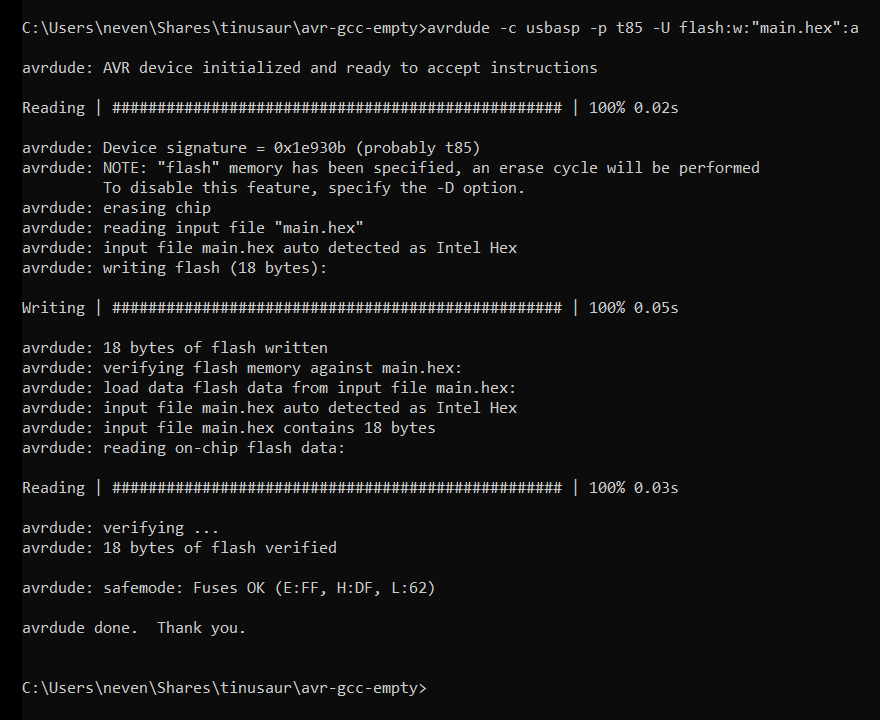
avrdude -c usbasp -p t85 -U flash:w:"main.hex":a
In this example “-p t85” specifies that the microcontroller is an ATtiny85.
NOTE that this program does not do anything. It is just an example of checking our setup.
We could also take a look at the assembly instructions of our program:
avr-objdump main.elf -d
The result should look li this:
   0:   cf 93           push    r28
   2:   df 93           push    r29
   4:   cd b7           in      r28, 0x3d       ; 61
   6:   de b7           in      r29, 0x3e       ; 62
   8:   80 e0           ldi     r24, 0x00       ; 0
   a:   90 e0           ldi     r25, 0x00       ; 0
   c:   df 91           pop     r29
   e:   cf 91           pop     r28
  10:   08 95           ret
If we add the “-Os” the compilation will be performed and optimized for smaller code sizes. Let’s try this:
avr-gcc main.c -Os -o main.elf
Then, check the assembly instructions:
avr-objdump main.elf -d
The result will be something like that:
   0:   80 e0           ldi     r24, 0x00       ; 0
   2:   90 e0           ldi     r25, 0x00       ; 0
   4:   08 95           ret
It is really obvious that the code size is much smaller.
The real “Hello, World!” program
For how to write a real “Hello, World!” program that actually does Blinking LED look at the “AVR GCC Hello World” tutorial. (COMING SOON)